Whether you are a software developer or tester working with IntelliJ IDEA, disk space issues is bound to happen. And when this happens, you will try to find a way how to move IntelliJ root folder in another disk. If you are not aware, once you start working with IntelliJ IDEA (i.e. Community Edition 2016), it deploys huge data on your hard drive. These data is part of the process when you clone a project from your repository. You are lucky if your repository does not load huge data of plugins, cache, configurations, and other dependencies. But if it does, here’s a quick way on how to move IntelliJ root folder like .IdeaIC, plugins, and logs into another drive.
In our previous article, we discussed how to find large files in Windows 10. And because of this step, we were able to find out that our IntelliJ is loading huge data on our primary drive C:\. This was contributing to the speed and performance of our machine. We’ve thought that cloning a project on a different drive was the solution. We’ve never thought that there are other files that we can move to save more disk space.
And that’s what we will be sharing with you now. But before we start, make sure that your IntelliJ IDEA is closed.
Page Contents
Steps on How To Move IntelliJ Root Folder Into Another Drive
By default, IntelliJ IDEA will load all dependencies on your primary disk storage. This includes the cache, configurations, system files, logs, indices, cache, and others. Over time, these folders will get bigger and consume most of your disk space. With the steps below, we can somehow control and manually configure where these folders in another drive.
For this example, we will show you how to save more disk space on your primary disk (C:\). This is by moving the deployment files into another drive, let’s say D:\. And the we will be showing using the IntelliJ IDEA Commnity version 2016.3.4 version.
1. Locate the file idea.properties
This idea.properties is the key solution for all of our problems. It is a configuration file where you can utilize to customize the location or path of your IDE dependencies. In Windows 10, you will locate the idea.properties in:
C:\Program Files (x86)\JetBrains\IntelliJ IDEA Community Edition 2016.3.4\bin
Sometimes, the idea.properties can be located in:
C:\Users\[YOURUSERNAME]\AppData\Roaming\JetBrains\IntelliJ IDEA Community Edition 2017.3.1\bin
2. Open idea.properties using a text editor
Although this property file can be opened using any text editor like Notepad or Notepad++, you need to open the file as Administrator. This is because the file is inside the Windows system folders. And you will need special privileged to do any changes.
3. Specify the new location where you want to move the folders
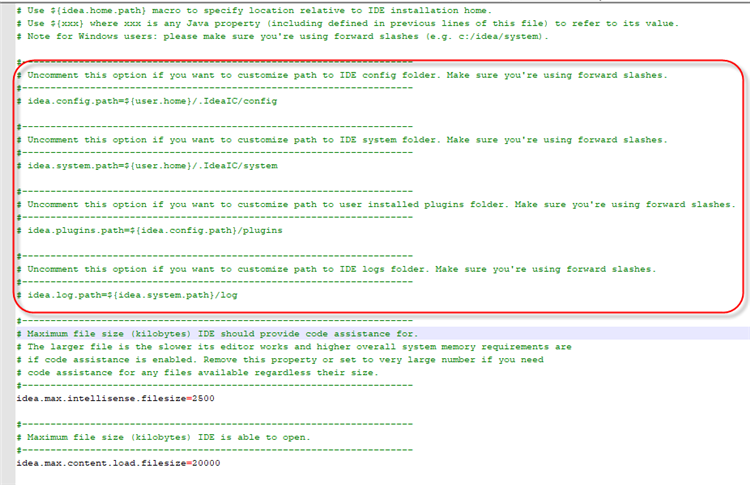
You can now update the following lines in the idea.properties and customize the location of the root folder, logs, and plugins. You can uncomment each options or copy and paste the options into a new line. The parameters you want to change are:
- idea.config.path
- idea.system.path
- idea.plugins.path
- idea.log.path

If you are unfamiliar on how you can modify or change the configuration into a new path, check the example below. This example of configuring the idea.properties to move IntelliJ root folder was also tackled in IntelliJ’s support blog.
4. Save the changes
Once you’ve completed the changes, you can now save the file. And that’s it! The next time you open your IntelliJ IDEA, it will now load the root folder, plugins and logs into the new directory.
But Wait We’re Not Done Yet
Yes folks, we’re not done yet. Before you hit that button to open your IntelliJ IDEA, you may want to consider doing the following first. The changes you’ve made above will NOT YET guarantee to save you more disk space. This is because you’ve only updated the configuration that will take effect on the next time you open the application. However, the old files are still lying there in the default storage. Which means the folders are still in the primary disk storage.
You can try moving these folders into the new location you specified in the configuration. OR, delete them permanently and just clone again your repositories once you open again your IntelliJ. It will be like a fresh install.
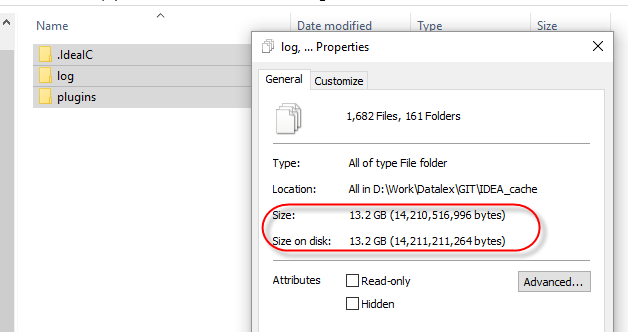
From the steps above, here’s a screenshot of how much disk space we’re able to offload from our primary disk. It was around 13GB. It’s a big reduction and free space on our primary disk space. 
Knowing how to move IntelliJ folder into another location to save more disk space is quite effective. It can improve the performance of your Windows 10 since there will be enough room for the operating system to cache some applications.
