Yes, we do understand that finding large files on PC can become so much challenging. Especially if you don’t know what to look for and where.
Another obstacle can be the number of folders you already have kept for years. And this software and files you have are draining now the free available disk space you have on Windows 10.
Moreover, you can now feel how sluggish your computer because your free disk space is now running low.
This is what we will try to address now in this article.
We will compile ways how you can manage your disk space in Windows 10. We will try to show you how to find large files on a PC and let you decide if you are ready to delete them.
Page Contents
Windows 10 Hard Drive Partitioning Is Not Always Helpful
Before we start, it is a viable and common setup that we see partitioned hard drives. A common configuration practice is to divide a hard drive into two (2) partitions.
The primary disk (C:\) will be left mainly for the operating system and other software. While the secondary disk (D:\) will be left for you to manage your files.
However, in the long run, even if you have such a setup, it can’t be helped that your primary disk will run low in disk space.
Why?
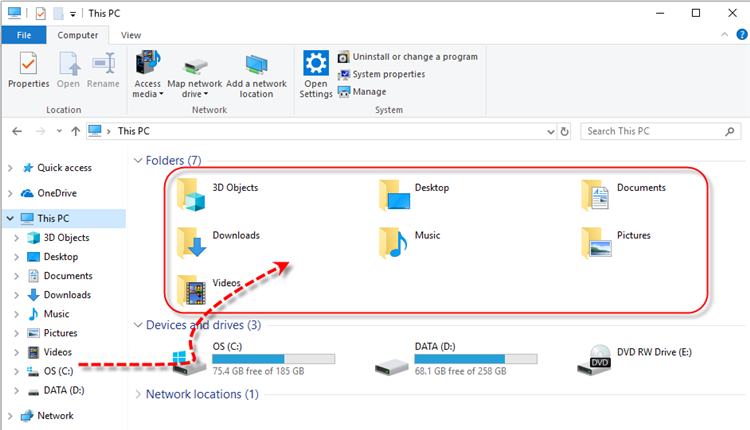
After the Windows 10 post-installation, the operating system will automatically create folders to help you organize your files. The least folders it will create are:
- Desktop
- Documents
- Downloads
- Music
- Pictures
- Videos
These folders are set up under your primary disk (C:\). And this is the default configuration when you or your I.T. engineers install Windows 10. Actually, this has never changed even with the old versions of Windows.
here are other Windows applications or software, by default, store unnecessary files on your primary disks.
Some software that we’re talking about is Outlook, Skype, and many more.
Having said that, if you did not configure these folders furthermore then you will feel the effects of it after a few years. You will slowly see your primary disk losing free disk space. And you don’t want that to happen.
Alright then, let’s start managing your disk space storage and find those Windows large files.
How To Change Location Of Documents, Pictures, Videos, Downloads, etc
Let us start with managing your default folders and move them away from your primary disk storage.
Since the assumption here is you have two (or more) partitions, we will move these folders somewhere else.
Let’s use Documents for this example. You can do the same steps for the other folders, i.e. Videos, Pictures, etc.
- Open File Explorer (also known as Windows Explorer). You can either find File Explorer from the Start menu or press Window key + E simultaneously.
- Look for Documents and right-click on the icon.
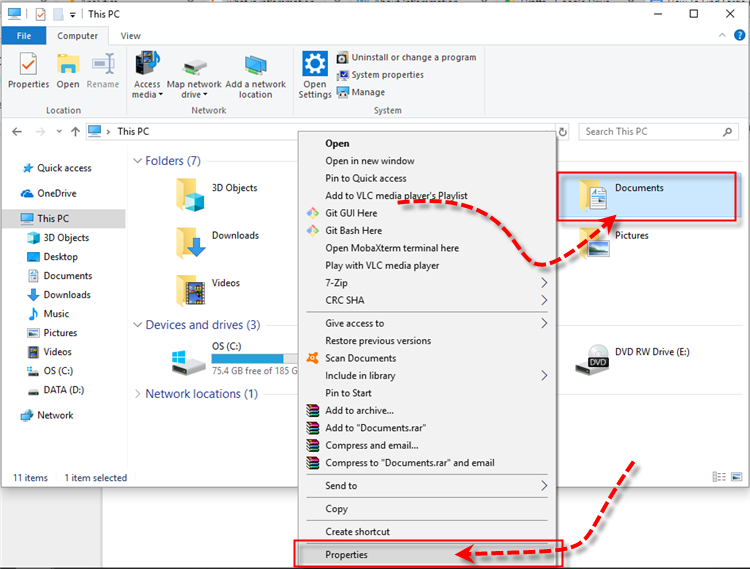
- Select Properties. Then on the Document Properties, click the Location tab.

- As you can see, the location of Documents lies within the primary disk storage of your hard drive.
-
C:\Users\<Your Windows Username>\Documents
-
- Click Move then select a new location for Documents. We recommend that you put it on your secondary disk storage (D:\).

- It will now start to move your folders and files from the original location into the new one you have selected. This may take time depending on the size of the whole directory. Once this is done, you can do the same steps on other special folders.
With the steps above, we have now free-up some disk space from your primary disk. We’re not stopping here. Let’s go to the next step.
Leverage the use of Windows 10 Storage Sense

If you think you already know all of Windows 10’s features then you should know Storage Sense by now.
If not, then you’re missing one of the nifty features of Windows 10. Storage Sense can help you with your disk storage problems.
Windows 10. Storage Sense is a tool to aid users to get rid of junk and old files that you might have forgotten to completely delete.
You can also use Windows 10 Storage Sense to automatically save your contents into another drive. It is a simple helpful tool to help you gain more disk hard drive storage if you are running low.
Here are the steps on how to configure Storage Sense on Windows 10.
- Go to Start -> Settings -> System -> Storage.
- By default, Storage sense is turned off/disabled. Toggle the switch to enable/turn-on Storage Sense.

- To configure Storage Sense further, click on “Change how we free up space automatically” to see the other options.

- The first option is to select how you want to automatically clean up your drive to free up more space. As of writing this, here are the options available:
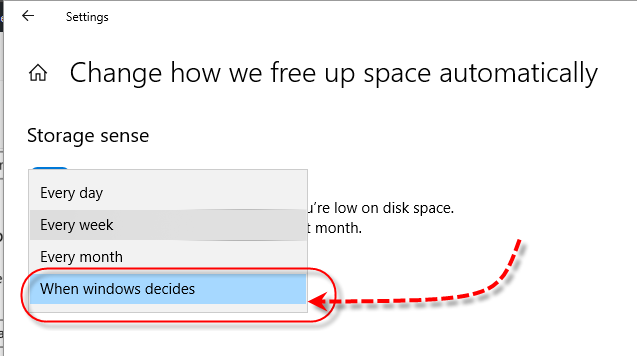
- Every day
- Every week
- Every month
- When windows decides
- From the options above, our preference will be “When windows decides“. This is to make sure that Storage Sense will only execute whenever needed.
- After this, setup now how you want your Temporarily files to be managed. There are 2 common locations or folders where we most of the time forget to clean. The Recycle bin and Download folders. With Storage Sense, you can now set the number of days where the files will be completely deleted if they are overdue. Let’s say set the configuration to 30 days. Files in your Recycle bin that have been lying there for 30 days will be deleted automatically. Likewise for the files in the Downloads folder.

- If your disk drive storage is now running low, you have the option to free up some space by clicking “Clean now“. Otherwise, you can now go back to the main window. All settings are automatically saved.
How to Automatically Change Drive To Save New Contents With Storage Sense
Now that you have set the clean-up automatically, we will now configure Storage Sense further.
This time, let’s automatically set your PC or laptop to automatically save new contents on another drive. The idea of this is the same as the steps we shared above on how to change the location of Documents, Videos, and etc.
But this time, we will use Storage Sense to do it. NOTE, if you have already done the steps above and changed the locations, select only the options here which you have not done yet. This is to avoid conflicts.
- Go to Start -> Settings -> System -> Storage.
- Scroll down and click More storage settings -> Change where new content is saved.
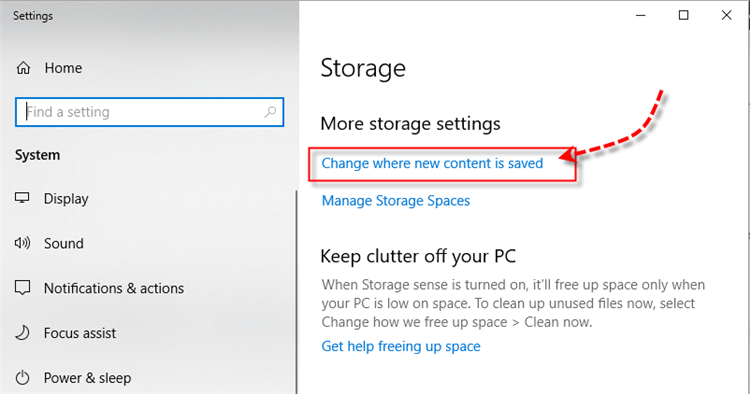
- Select from the options you wanted to change the contents’ location when saving. Click Apply after.

We have now enabled and tweaked Windows 10 Storage Sense. The configurations and setup we just did will help future contents and files to be managed to minimize the problem on disk storage.
But we’re not done yet, there’s more we can do to free up some more disk space.
Let us continue.
How To Manually Find Large Files On PC
Although the methods above are helpful, there are still some big files stored on your hard drive. These files could be generated or created by some of your apps or software.
Some Windows software or applications creates a folder for temporary storage.
Let’s say Skype for Windows, for example. By default, it creates a folder named “My Skype Received Files“.
This is where all shared or transferred files to you from your contacts will be stored. Unfortunately, this folder is configured on the primary disk storage as well. We can discuss this matter on some other day though. 🙂
Or if you are using a desktop PC or laptop which is being shared with the whole family, then it will not be a surprise that soon you will run out of disk space.
In cases like this, we have to manually find large files on PC. But we want to remind you of the following first:
- We can help you search for large files BUT be careful before you decide to move or delete them;
- Deleting files can result in a problem especially if these files are being used by your Windows 10 system or an application;
- If you are not sure whether to delete a large file, research first or ask someone who is more technical.
- Again, we are not recommending you to delete unless you are SURE.
So, here are the steps to manually find large files on a PC or laptop in Windows 10.
- Open File Explorer (also known as Windows Explorer). You can either find File Explorer from the Start menu or press Window key + E simultaneously.
- Tap once the “Search This PC” field and notice that Search tab.

- Once the Search tab is displayed, we’re only concern about the Size option. Click the drop-down menu of Size;

- You will see the following file search options in terms of file size;
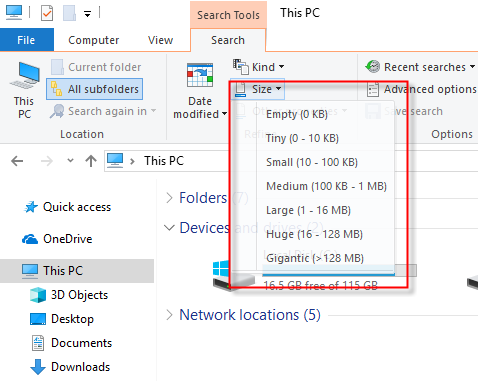
- Empty (0 KB)
- Tiny (0 – 10 KB)
- Small (10 – 100 KB)
- Medium (100 – 1 MB)
- Large (1 – 16 MB)
- Huge (16 – 128 MB)
- Gigantic (> 128 MB)
- Let us start to find large files on PC and when we say “large” we can start with Gigantic. Let us see which files with a size of more than 128 MB are eating up your free disk space. Once you select Gigantic from the drop-down, it will automatically start searching. And notice the Search field, it will automatically populate the search parameter below:
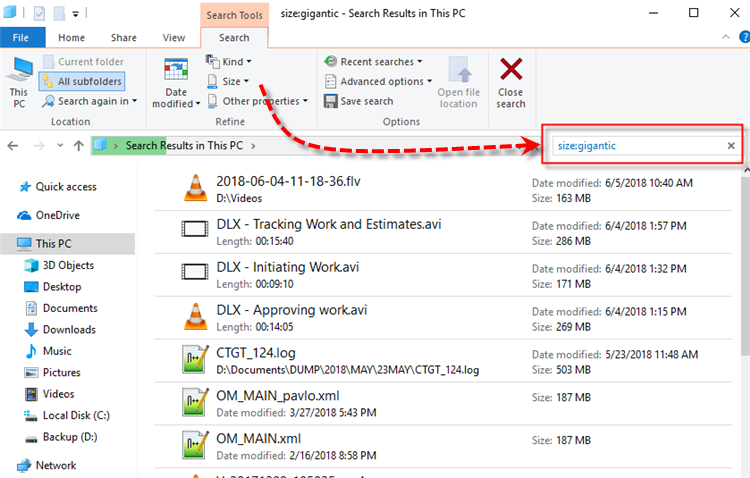
Search parameter : size:gigantic
- The searching process can take a while depending on how big is your disk storage and how many files you have. Our suggestion does not do this search on “This PC”, instead start on your primary disk (C:\);
- Once the search is completed, let’s sort the view display by size. So click on the View tab and choose Details under Layout. Then sort by Size;

- Go through each file from the result. Delete the files you no longer need ONLY if you are sure of what you are doing.
Alright! Now, I am sure you have gained more disk space by now. However, we’re not done yet. There are more ways to save disk space on Windows 10.
Get More Disk Space with Windows 10 Disk Cleanup
There’s another Windows tool to get more disk space but it is not as efficient as those I’ve mentioned above.
This is the Disk Cleanup Windows tool. It is not a new feature but it can still help you remove some more files.
You can use this to remove temporary Internet files.
- Go to Start menu -> and search for Disk Cleanup;

- Then select the drive you want to clean;
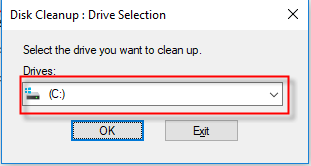
- Then the Disk Cleanup window will be displayed, select which one you want to clean-up and press OK to proceed.

Are You Still Trying to Find Large Files On PC to Save More Disk Space on Your Hard Drive?
If you still not contented with the amount of free space you have now on your hard drive, you might also want to uninstall those software or applications you no longer needed.
In case you didn’t know, Windows 10 is also packed with bloat wares. Some of the applications you can delete are games you are not using or other pre-installed software that you don’t need.
These will add more free space to your hard drive.
Also, I suggest that you regularly monitor your disk space if needed. Or you can use third-party software like Smart Disk Cleanup.
This tool is available in Microsoft Store and it is totally FREE. 
Or you can do regular backups of your file with an external hard drive. It is an alternative solution if you are adamant to delete any files from your PC.
Dr. Anand Bhadwaj
Very Nice article good job. its very informative.
Thank you