Page Contents
“Bypass Internet censorship? Why should I need that?”
Probably you are thinking now what in the world am I talking about when I say – “bypass Internet censorship“.
Well, if you are in a country where you can freely access almost any website with no problems, then there is no need for you to read any further.
Otherwise, you may want to take these quick steps to bypass Internet censorship.
For some of you who don’t know, there are countries out there filters your Internet usage by monitoring your Internet traffic. Like how you use your email, what social media you visit, or what updates you place on it, what kind of photos you upload to Facebook or Instagram (just examples), or what are you searching for on the Internet.
In general, one of the main reasons for this is “security of that country and all the information within” against the outside world – or vice versa.
There’s nothing wrong with that (look at the bigger picture) because your country is trying to protect you.
However, there are times that Internet filtering is becoming so pervasive and you are no longer able to connect to the world. Or with your families especially if you are working abroad or away from your country.
And that is why I will share with you a quick way to bypass Internet censorship and once again connect to the world.
I have been here in Shanghai, China for more than 6 months now (as of writing this). And from where I came from, I was so dependent on Google and hooked with social media like Facebook, Instagram, and Twitter.
The main reason is I need these websites for my research and also for promoting my content as a blogger.
But all of that was gone the moment I set foot here. Oh yeah, there are alternative websites of course – but the problem is most of them were written in Chinese – “most” not “all”.
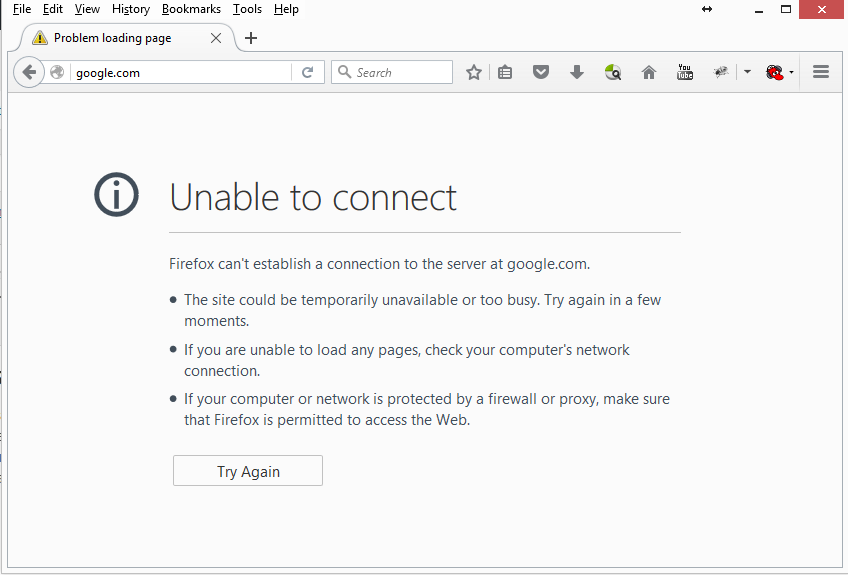
Disclaimer: I am not an activist neither giving any ideas of malicious intent to the readers. The steps that will be shared here are for learning purposes only.
If you are planning to use this to go against your country’s laws, think twice before doing it. The author will not be held liable for whatever will be the outcome of your actions.
Actually, I was really aware that I will be deprived of Internet access for websites like Google – or any of their products – and other social media like Facebook.
I even tried not to prepare for it before going to China for me to experience life without it.
But it was too hard for me – hard for me and work. Especially most of my mobile devices are Android. So, imagine that Google is no way allowed to get through the Great Firewall of China.
I can’t update my apps, read the news feeds from my Facebook, nor upload and share beautiful places I visited here in China.
At first, I started to download and test a couple of ways like VPN or tools for me to be able to bypass Internet censorship.
I have here a couple of list that I have tested working:
- VyprVPN (PC and mobile) Best VPN Services so far and ranked as the best VPN for China by Greatfire.org.
- Psiphon (PC and mobile)
- VPN Master (mobile)
- Betternet (mobile)
As of writing this, the applications above are working just fine – especially VyprVPN and Psiphon. These 2 applications really helped me with my work and life here in China.
But there’s another way which I have not considered – and that is tunneling under the Great Firewall through SOCKS5 using Shadowsocks and Amazon’s AWS EC2.
And folks, that is what I will be sharing with you.
How to Setup Your Own Shadowsocks Using AWS EC2 to Bypass Internet Censorship
- First, register a free account in Amazon Web Services and use their AWS Free Tier.
- Once your registration has been approved, login now to your AWS console.
- There are so many great services offered by Amazon but what you will only need is the EC2 under Compute. Click that option.

AWS EC2 Virtual Servers
- Before launching your new instance, select the most suitable and closest country/region near where you are now. I opt to select Asia Pacific (Tokyo) which I think is more stable and near China.

AWS EC2 Virtual Servers
- Then in your AWS EC2 Dashboard, you will need to create a new instance.

AWS Create New Instance
- You will now go through a step-by-step installation. Don’t worry because it is not hard to follow. TIP: Just select the “Microsoft Windows Server 2012 R2 Base – ami-e3ba838d” free tier and press Next until you complete the whole setup. If you are Linux/UNIX savvy then you can go for it but for this tutorial, I will only show the steps for the Windows version. Also, stay with the FREE Tier or you might get charged if you increase your disk space above 30GB.
- By the way, during the installation, you will be asked for the security group. You can choose the default (default VPC security group) or opt to create your own. The important thing is you take note of it because we will need to add rules for that later on.
- Once you have completed, you can launch the new instance you have created. Wait for approximately ~5 minutes before you proceed to the next step.
- Let us set up your Security Group first. The key here is we need to add rules to the security group you either created or the default one which is associated with your instance. For example, my instance is associated with the default security group. Then that is the one we need to update. So, expand the NETWORK & SECURITY and click Security Groups.

AWS Security Group
- Then on the right-panel, under it click the Inbound tab.

AWS Inbound Rules
- Make sure you have RDP allowed in your Inbound because you will be using the Remote Desktop tool to access your instance. Then the 2 next important tool is the “Custom UDP Rule” and “Custom TCP Rule” that you need to add. These 2 protocols will be valuable for setting up your Shadowsocks proxy. So all you have to do is add them with the port you want to use i.e. 2444. Make sure the ports for both are the same.
- Then the next to configure, although optional, is the Elastic IPs. I recommend for you to set this up because in case Amazon decides to refresh their system or a reboot needs to happen then you will need to go through accessing your AWS console again and checking the public IP address assigned to your instance. So from the same NETWORK & SECURITY Option, click Elastic IPs and associate your instance to the Public IP assigned to your instance.

AWS Elastic IPs
- Then go to your AWS Console and click Instances. You will need a tool called Remote Desktop to access your new instance. But before you do that, you must get your Instance’ password. So right-click your instance and click Get Password. This is a little bit tricky now but still easy. Remember during the installation process, you were given a password perm file (I hope you have not yet deleted it). You will need this option to decrypt so that you can obtain your password.

AWS Get Password
- Once you have your password (keep it and also the perm file as you will need it in the future), open your Remote Desktop tool, put the public IP given to you, and log in as Administrator using the decrypted password.
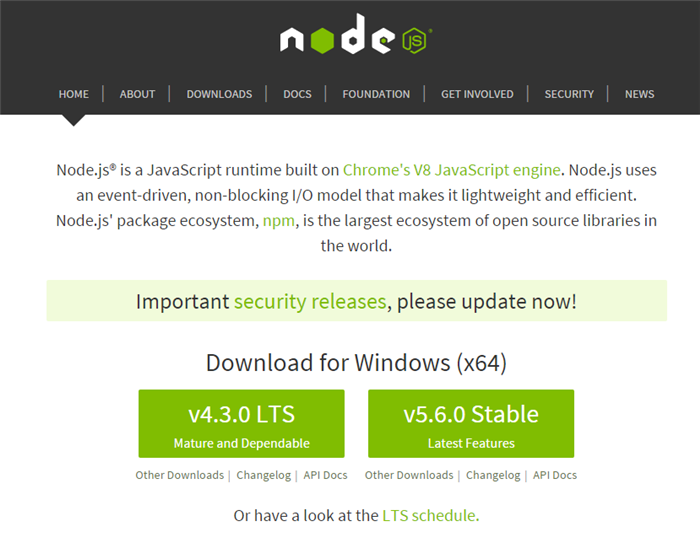
- You are now logged in to your instance. It’s time to set up now your Shadowsocks VPN. Open your instance’ browser, but I recommend you download and install either Google Chrome or Mozilla Firefox because the pre-installed Internet Explorer has a higher security and annoying pop-ups will keep on displaying while you are browsing. Go to https://nodejs.org/en/download/ and download the Windows Installer (.msi) for 64-bit.

Node JS for Windows
- Once it is installed, we need to configure the Node.JS. So click start and find the Node.js command prompt.

Node JS command prompt
- Then run this command below to continue with the installation. The installation will just take less than a minute – just few seconds.
npm install -g shadowsocks
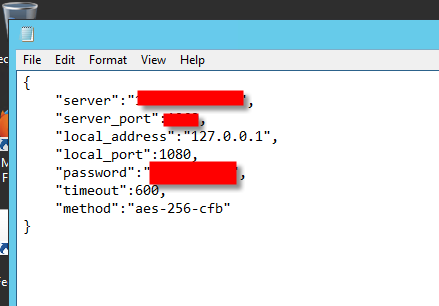
- Then open Windows Explorer, and locate the config.json file. In my case, I found it in C:\Users\Administrator\AppData\Roaming\npm\node_modules\shadowsocks. Open it with Notepad.
- There are only 3 things that you need to change the values:
- server: – put here the local IP address of your instance and NOT the public address
- server_port: – put here the port number you add in the AWS Security group i.e. 2444
- password: – your own password.
- The others, leave them as they are good enough to use.
- There are only 3 things that you need to change the values:
- Save your changes and go back to your Node.js command prompt.

Node JS config JSON
- To start and invoke your proxy, just type:
ssserver
- You will now see that the service has started.

Shadowsocks ssserver
You’re done – but not yet completely done. You have only set up the Shadowsocks proxy server but how can you now use it?
You need to set up your local machine to connect and tunnel through your proxy. So here’s how to do it.
IMPORTANT
I would recommend that you restart/reboot your instance after the whole installation. In some cases, since you have changed in the Inbound firewall and also you have installed an MSI file, you need to reboot the machine for it to take effect.
How to Connect to your Shadowsocks Server for Browsing
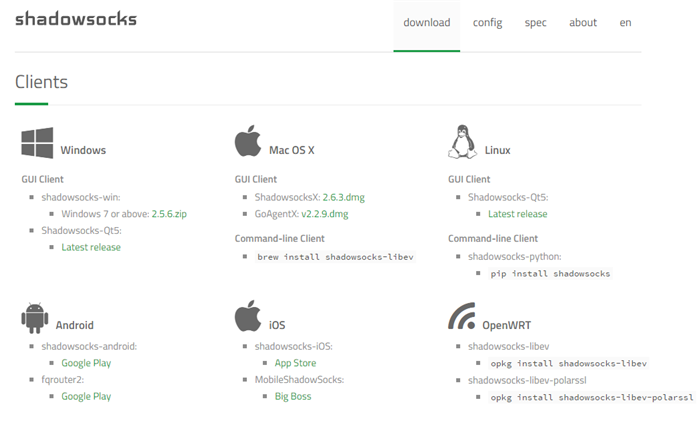
- On your local machine, open your browser and go to https://shadowsocks.org/en/download/clients.html to download the most suitable client for you.

Shadowsocks Client
- For my case, since my machine is Windows 8.1 I downloaded the Windows Gui Client – but I preferred the Shadowsocks-Qt5. Once you downloaded the client (I will demonstrate the one I used), extract it, and open it.
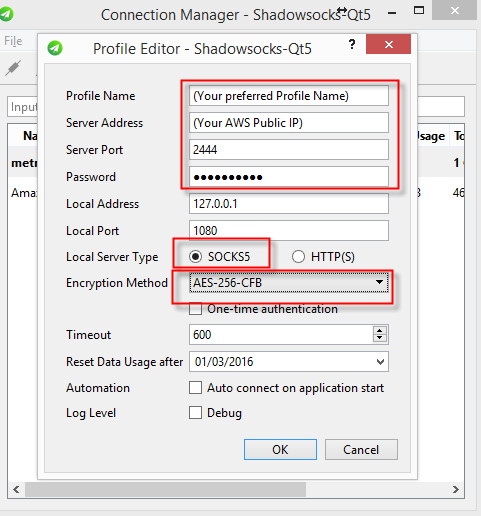
- You need to add a new profile with connection details. All you need to configure are those fields I highlighted below. Note, that the server port should be the same as what you have configured above i.e. 2444.

Shadowsocks Qt5 Client
- Save it by clicking OK. Then click the connect icon.

Shadowsocks connect
- Now once connected, open your Mozilla Firefox (sorry guys, by default it is only Mozilla Firefox that has the capability to use SOCKS5 settings but if you prefer Google Chrome you will need to use a plugin which I will show in another post).
- UPDATE: You can check this article if you setup SOCKS5 Proxy on Chrome.
- Configure the connection settings of your Mozilla Firefox to connect to your local machine. You just need to opt for Manual proxy configuration and type-in 127.0.0.1 under SOCKS Host and the port is 1080 (same with all the configuration above). Then use SOCKS5 and tick Remote DNS. Once done, click OK.

Mozilla Firefox Settings
- You’re finally DONE! You can now access sites like Google.

Connected to Google
I hope this article helps you to bypass Internet censorship. Enjoy!
For further watching and reading about the difference between VPN and Proxies and Internet Censorship (for the videos, just ignore the endorsements if you are not interested):
Internet Censorship
- Internet censorship and surveillance by country | Wikipedia
- Top 10 Internet-censored countries | USA Today






Claes
Hey Arsie,
The server works fine, but shadowsocks connection is timed out and the websites do not load, what could be the problem?
Arsie Organo Jr.
Hi, have you ensured that the AWS sock is opened?
Jacob
Hi, i have the same problem. Server works fine, but ss connections shows time out…btw, how to make AWS socks open? I have followed all the steps you showed.
Arsie Organo Jr.
Follow steps 10-11 then restart your AWS instance. That’s how I was able to make it work.
James Wilde
Shadowsocks is really helpful. I think people will be benefited by reading your important post. And one more important thing is that most of the internet user try to use VPN connection for secure their data.
Thanks for sharing your helpful tricks with us. 🙂
Oliver
Great manual.
Unfortunately I cannot connect.
All setup like you mentioned. But I do not get a connection on the WINDOWS Server side.
Any hint, what could went wrong or where I should look into?
Thanks so much!